 Liability Liability
 by Chih-Cheng Yeh, Urbana IL
From the Illini
Regional Daily Bulletin, May 2015
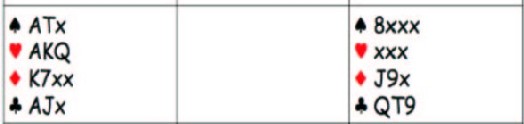 West
North
East
South
West
North
East
South
Pass Pass
2H
DBL Pass
2S Pass
3NT All Pass
Opening lead:
♠7
West’s jump to game was a little spirited (to put it kindly), and 3NT looks to be an underdog despite partner generously providing more values than promised. Still, the contract is not hopeless.
South follows to the first trick with the ♠Q, suggesting that North led spades from an initial holding of KJ97(x). You duck the first trick, and South switches to the ♥10. You win the ♥A and North follows with the ♥J.Now, all you need to do is to play the diamonds for two tricks while simultaneously forging an entry to dummy to take the (hopefully) winning club finesse.
You start by leading a low diamond to dummy's ♦9, which fetches the ♦Q. South continues with a second heart and North sheds a low club (a spade would have been better). You play a second round of diamonds to the ♦J, both defenders following low.
Do you see the way home from here?
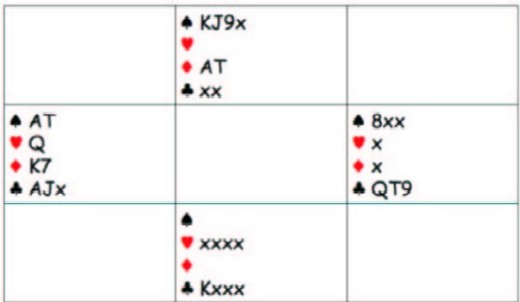
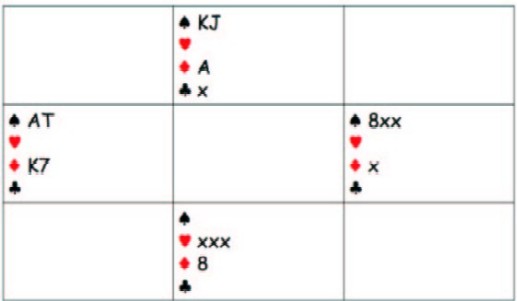
South’s failure to return a spade suggests he held the singleton ♠Q. Also, he probably has the ♣K for his opening preempt (although you have to play him for that card anyway). So, at this point, you are fairly confident that the remaining cards are distributed as shown here:
You run the ♣Q successfully and cash your winners in hearts and clubs. North is squeezed out of a couple of long spades. Then, you put North in by leading ♠A and another spade, and he has to give you the ♦K as your ninth trick. The full hand is:
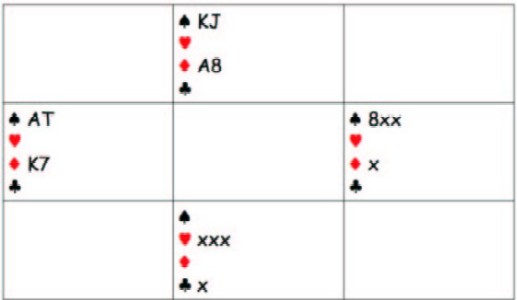
A useful guideline in bridge is to play the card you are known to hold (provided that doing so does not give up a trick). On this hand, North should follow to the second round of diamonds with the ♦10, the card he is “known to hold”. Then, as long as he holds onto all his clubs, by the time declarer finishes cashing round-suit winners, the position will still be unclear from declarer’s point of view.
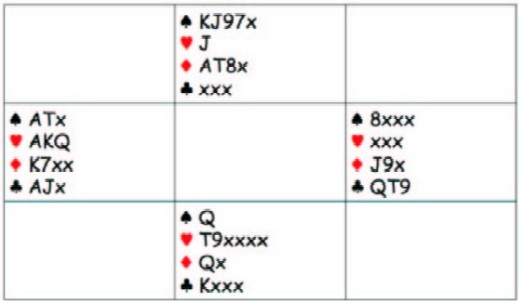
The first diagram below is the actual hand, in which the endplay succeeds. However, if the layout were instead the one in the second diagram, declarer would have to try to establish a long diamond since there is no endplay. There is a real chance that declarer will go for this play in diamonds, which leads to one down.
(1) (2)
The key is to keep declarer guessing by providing the least amount of information possible. Once the location of North's ♦10 is exposed, the card can turn into a serious liability and should be gotten rid of at the first possible opportunity.